Getting Started Using Web Factory
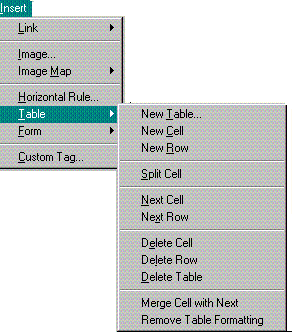
Use the buttons  on the Elements Toolbar to add more cells or the Insert menu, Table option to delete cells from the table.

- To add a new cell:
- Place the cursor in the table to add a new cell.
- Click on the Elements toolbar, New Cell
 button.
A new cell is added to the right of the current cell.
- To add a new row:
- Place the cursor in the table to add a new row.
- Click on the Elements toolbar, New Row
 button.
A new row is added below the current row. Also creates the first cell in the new row.
- To split a cell:
- Place the cursor in a cell.
- Click on the Elements toolbar, Split Cell
 button.
The current cell is split into two cells.
- To delete a cell:
- Place the cursor in a cell.
- Click on the Insert menu and select Table.
- From the sub menu select Delete Cell.
The current cell and all contents, including text and images, are deleted.
- To delete a row:
- Place the cursor in a cell.
- Click on the Insert menu and select Table.
- From the sub menu select Delete Row.
The current row and all contents, including text and images, are deleted.
- To delete a table:
- Place the cursor in a cell.
- Click on the Insert menu and select Table.
- From the sub menu select Delete Table.
The current table and all contents, including text and images, are deleted.

Note |
To unformat the table:
Remove Table Formatting removes the table structure but leaves the text. Select Remove Table Formatting in the Table submenu. A break tag <br> replaces each cell border. |
This Web page created in Web Factory.
![]() on the Elements Toolbar to add more cells or the Insert menu, Table option to delete cells from the table.
on the Elements Toolbar to add more cells or the Insert menu, Table option to delete cells from the table.